
|
|
#1
 07-28-2008, 03:16 PM
|
|||
|
|||
|
How I do Freeze and Fuse
By Mike Jordan (mjordan@europa.com) Freeze and Fuse is the method of taking wet powder glass, mixing it with water then packing it into a mold of some kind so it forces all the water to the top, which is then blotted off with a paper towel. The mold is then put into the freezer for about an hour until the wet powder is frozen in the mold. The mold is taken out of the freezer and the frozen frit object is popped out onto a kiln shelf like you would pop a ice cube into a glass. The frozen object is then taken to a temperature hot enough to fuse all the powder frit together, forming a solid glass object. I learned about Freeze and Fuse while searching on the web for molds and mold making to do some casting. During my searches I ran across the web site of Paul Kimbal. His web site is at: http://www.pyrosglass.com and he has information on there as well as kits that he sales. Another woman, Lynn (I don't have her last name at the moment) posted on Warm Glass about it and evidently was working with it at the same time, but independently, as Paul. Those two are where I got most of the information I used to start me doing this. This tutorial is information on how I've taken the information I've learned from Paul and Lynn and interpreted it to create Freeze and Fuse objects my way. I don't mean to say that my way is any better than theirs, it's just after doing hundreds of FnF objects, I've changed some of the ways I do this... some because it's shorter, some because it's quicker and some because it's easier. To start off with, you don't need a lot to do FnF. You need water, a mold, powder frit, paper towels and something to pound the frit with. That's just about it. Here is a picture of what I use: 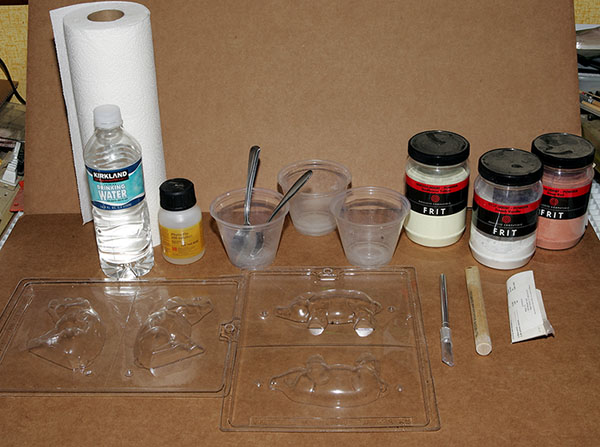 Some of the instructions I've read say to use distilled water. This is one of the short cuts I take because I don't think it's necessary. I do use bottled water though, since it has been filtered and is probably cleaner than what comes out of my tap (defiantly has less chlorine). We get lots of the Kirkland brand water from Costco, so that's what I use. I've never noticed any problems using it. Something else that helps (but probably could be skipped is well) is a soaking agent that helps the water release from the glass powder... or in other words, something that keeps water from causing water spots on dishes. I use Photoflo, which is a wetting agent used in photography to help water run off film spot free when it's drying. I've got a lot of this from my darkroom days, so I use it. All that is needed is a drop. Jet Dry that is used in dishwashers can also be used as well as liquid dish soap. All you need is a drop in a cup of water. If you use too much it can create foam. The X-acto knife and wooden dowel are used to pound the frit after it's in the mold. The bottom of the X-acto knife is a good size for the smaller molds and has a good weight to it. For larger molds I used the handle from a foam paint brush. One of these days I'm going to find some round brass, aluminum or Stainless Steel rod to use. I use round because it's easier to hold, but square would work just as well. You use these to tap tap tap on the wet frit, causing it to pack down. When it packs down it forces the water up to the top where you can blot it off with a sheet of paper towel. The idea is to get the top to be as dry as you can. You can tell this because it will be a dull color. If there is a shine to it, there is still moisture there. I use Bullseye powder frit, but any of the other brands will work just as well. Powder also works the best because it packs down. Larger frit might not pack as tight. I've read where others have mixed a bit of fine with their powder and have not had any problems. I've only done this one time on one of the big molds I did and I didn't have any problems either. I've not experimented with this yet to see how much bigger frit can be used and still get a good tight pack. Here are the steps I use to do a smaller mold (the mold is under about 2" in size): 1. Gather all the stuff together that I will use, water, cups, mold, frit, paper towels, etc. 2. I half fill one of my plastic cups with water and add a drop of the wetting agent. 3. Estimating about how much powder I'll need, I spoon in that amount into the cup. (Warning: Powder frit dust will float into the air and you could breath it in. Wear a mask, have good ventilation or other wise protect yourself from breathing in the dust. The slower you go until the powder is wet, the less dust you will cause.) 4. It only takes a few stirs and the frit will be good and wet. Note that if there is a lot of water to frit, the frit will seem to disappear. This is because it is suspended in the water. If you let it sit a moment, it will fall to the bottom and you can scoop it out. I've been amazed at how much frit is still in my cup when I thought I'd gotten most of it. 5. Next I start spooning it into the mold. The more water in your spoon the easier the frit will slide off. I don't worry about how much water is in the mold since it's all going to be blotted off anyway. And the wetter the frit the easier it flows into all the nooks and crannies of the mold. After I've filled the mold enough that it's full of water, I'll take one of my tools and pack it down a bit. Then I do my first blotting. Then I add some more frit, pack some more and then blot. I do this until the mold gets to be almost full of frit, then I start looking to see where it needs to be leveled off. I add enough to make it even with the top of the mold (for real deep molds, I sometimes do not fill to the top) and then I start tapping and blotting again. After tapping for a few minutes I'll blot every time I see a sheen of water on top. You will also see that where the frit was at the top it is now down from the edge a bit. That shows that the powder is packing down nice and tight. Keep tapping and blotting until you have a nice dry looking top with no moisture sheen. At that point, you are done with that mold. 6. I usually do several of these at a time, so I'll now go to the next one. If there are several molds on the sheet I'm working on, I'll usually fill each one at the same time and tap and fill all of them at the same time. 7. Once you have completed all the molds you are going to do, take them to the freezer and set them on a shelf. Hopefully you thought to clear a space before you started working. Leave them in there for about an hour. Real small items, dime size or so, probably only need about a half hour... depending on how low you keep your freezer. Leaving them in too long can dry them out and cause them to crumble when you take them out of the mold. So don't put them in and leave them over night. If you forget for a couple of hours, that's probably ok. 8. Since I put each mold in the freezer before I start on the next, I usually have 15 minutes to 30 minutes separation from when I take them out. When the first one has been in the freezer long enough, I take it out and over to my kiln shelf. I usually have my kiln shelf sitting out of the kiln so I don't have to lean inside to pop the molds. I turn the mold upside down and flex the plastic right around the mold. Sometimes they pop out with hardly any help on my part. Sometimes I have to twist and push down on the bottom of the mold a bit before they pop out. If your mold has any thin areas, be real careful or the frozen frit could break at that point. Like with Humpty Dumpty, if a mold breaks, you can't put it back together again. Just take the frit and drop it back into your cup to thaw out and use it again later. 9. I usually use fiber paper on my shelf, but a kiln washed shelf also works very well. The fiber paper will tend to cause the formation of little spikes sometimes, where a kiln washed shelf won't. But sometimes I just don't feel like scrapping and re-washing my shelf and I find fiber paper a lot quicker and easier to use. 10. After I have popped out all the molds that were frozen, I put the shelf back into the kiln. When the frozen frit is first popped out, you will find that it is really very tough. You can pick it up, move it around, etc., and it doesn't hurt it. I've dropped one occasionally onto the shelf and it didn't hurt it at all. 11. Some people let them set on their shelf awhile (this is what Paul says to do in his instructions), which is suppose to help wick out more moisture, causing it to pack down tighter. I've tried it a number of ways... leaving it sit for an hour, over night and firing right away. To be honest, I've not seen any difference in the final results, so I fire mine as soon as I have them all in the kiln. If you do leave yours sitting for awhile, it won't hurt them either. Just don't touch them after they have thawed or it will fall apart and be a pile of powder frit again. The first time I let mine sit over night, they were sitting there looking so perfect that I had to touch one. I had barely touched it with the tip of my finger and it just collapsed into a pile of dry frit. It was really kind of interesting. So once they have thawed, don't disturb them in anyway. 12. I'll give what I use most of the time for a firing schedule, but keep in mind that while this works for me, it might not for you. There are so many variables that determine the firing schedule that it's really hard to do a "one schedule fits all" schedule. So keeping that in mind, here is my schedule: 200 dph to 400 hold 30 minutes (I do this to dry the objects out) 400 dph to 1320 hold 35 minutes 9999 dph to 960 hold 1 hour (the hold time depends on the thickness. 960 is Bullseye's annealing point, other brands could vary.) 200 dph to 700 0 hold (for thicker pieces I go 100 to 700) 500 dph to 200 and off (again, for thicker pieces I slow this down as well) If it's an important piece, I am more conservative. If I'm just wanting to see how the mold is going to work out, I'll be a little more aggressive with my times. I don't peek until after it gets under 250, then just for a second, if I peek at all. I have a big kiln (Skutt 1014) so I can peek without letting out very much heat or room air in. Smaller kilns might not do this as well. I mostly don't look until it's under 200 anymore though. Also, be prepared for shrinkage. Frit shrinks normally and FnF is no exception. I get about 15% or 20% shrinkage. The shrinkage does seem to be even around the whole object though. Just be aware that if you are making something that you want to be a certain size, to take the shrinkage into consideration. That's my basic routine creating FnF objects. I have also experimented with a few different methods to see if what I can come up with. One method I tried was putting different colored powder in the mold to add color for eyes and bring out other areas. Once you have tried FnF you will see how hard it is to put colors in a particular place and have it stay. When the frit is in water it wants to run all over the place. If it's just damp it wants to clump up. To get a particular color in a spot to stay, I will put it in dry and then put a layer of dry frit on top of it. Then when the layer of dry is protecting the spot color, I'll carefully add some water and more wet frit. I let the water soak down into the dry so it will pack down. I've been able to build up color in several items this way, which you can see in several of the pictures I've included. Besides putting it in dry, I will also take a little bit of powder and get it damp until it rolls up into a ball and I can shape it in-between my fingers. I'll then push this into the spots I want (just like the Pate de verre process) and then lay dry over it till it's protected and then add water and wet frit. With large molds, I've also started just spooning in dry powder until the mold is about half full. I then pour water into the mold to get it good and wet so it runs into all the nooks and crannies and then add wet frit normally for the rest of the mold. The frit has to be wet to pack down and hold it's shape, but that doesn't mean it has to be wet when you first put it in. Doing this with larger molds has worked out pretty well so far. A variation is I will pour about a 1/4" of water into the mold first and then spoon dry powder into the water. This also has worked without problems as well. One of the other things I want to try is to use enamel to paint areas on the outside while it's still frozen on the shelf. I want to see if this would be another way to add color to an object. I think it might work, but I need to try it out. There is a lot of flexibility in creating FnF objects. Experiment and try different things with it. I'm sure there are a lot of different methods that can be used to enhance how it comes out. Some of the problems and issues I've noted while doing FnF... One problem I've noted is a discoloration of the fused glass. This seems to happen mainly with the Bullseye reds I've used. I don't know if it's dirty water scum, too much moisture left in the frit, ramp speeds or what, but I've only seen it in a couple of things I did with red frit. Another problem has been where I didn't pack the frit down very well and I had little gaps or what looks like a popped bubble. I've had this happen on molds that had narrow areas or very detailed areas. I try to be careful and do some extra packing down in these areas. Having the narrow areas break taking them out of the mold is another problem I've seen. I did some chess pieces and the narrow area at the neck of the Bishop kept breaking on me. I had to be very careful taking it out of the mold to keep it from breaking, but still it broke 2 out of 3 times. When it breaks, I just drop the frozen pieces back into my cup to thaw out so I can try again. Some molds have a flat bottom and sit on my worktable so that when I tap with my tools it has a solid base to pack the frit down. Other molds are rounded or have other protrusions so that the mold does not sit flat. This is usually not a problem but sometimes I find if I cup the mold in my hand it is easier to pack down. Molds, molds and more molds... What kind of molds to use? Just about anything that will let you put wet frit in it and holds up to the tapping as you pack it down, will work. I've used candy, soap, candle, ice, plaster and even cement molds for my creations. Most have been made of plastic, but some of my molds have been rubber, metal, and I've even created my own RTV rubber molds. Candy, soap and candle molds can be found in craft stores or on the internet. Just Google the internet for "candy molds", "soap molds", "candle molds", etc., and you will get more hits than you can imagine and in every shape and theme that you can think of. And most of these molds are very cheap to boot. Size wise, the only limit I've found so far is how much powder frit I can afford. I've done things from a few grams of frit up to a mold that required almost 3 pounds of frit. I have one mold I'd love to do, but it's going to take over 6 pounds of powder (it's 2" round by about 1/2" to 1" thick cement stepping stone mold) and at around $70 for a 5 pound jar of powder at Bullseye, I haven't been able to justify doing it yet. Even at Bullseye's half price sell, that still adds up to a lot when I have so much other stuff I like buying. So I'm saving it and maybe use it as a project this winter. But even a mold that size should work fine with the FnF process. Some examples... Here are some examples of what I've done so far. These first ones were done with candy molds. 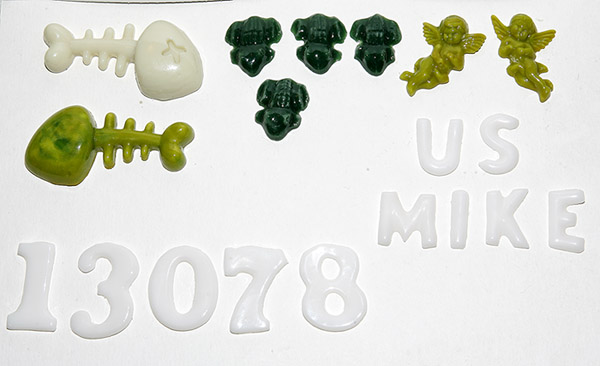 There gator was done from a larger mold. 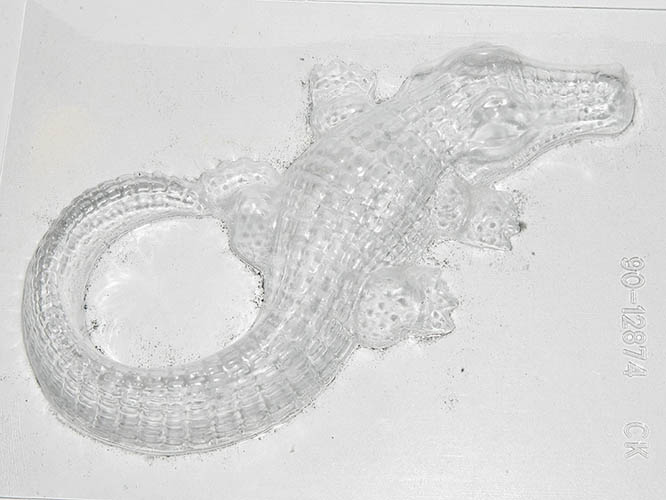 Here is the gator in it's frozen state: 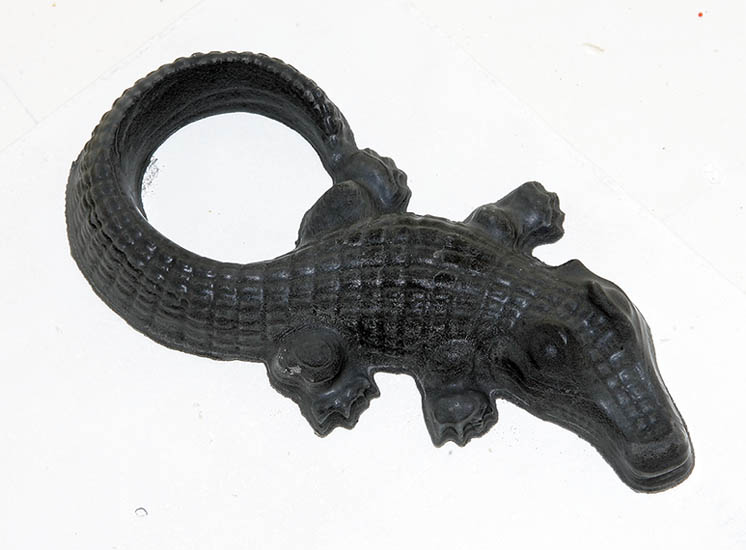 And here it is fired: 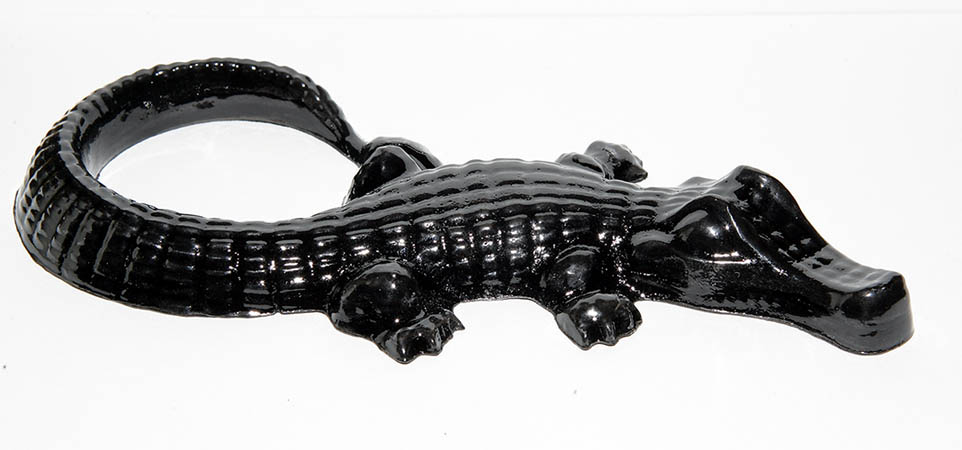 This is the largest object I did... almost 3 pounds of powder frit went into this frog: The frog in it's frozen state:  And here is fired (the different colors were put in dry and the base color built up around those colors): 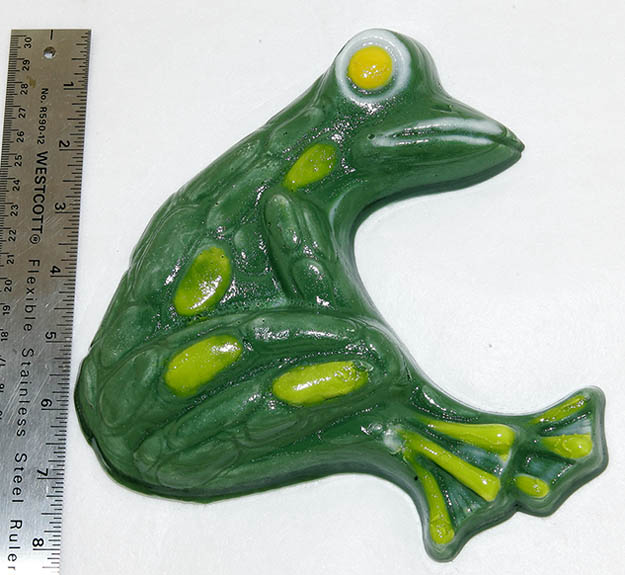 This Dragon Fly was done in a soap mold: 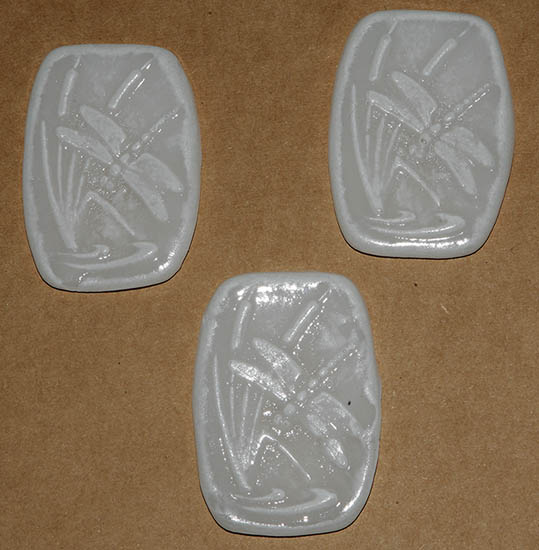 Here are 4 boned fish I did with a rubber ice mold. Here they are in their frozen state: 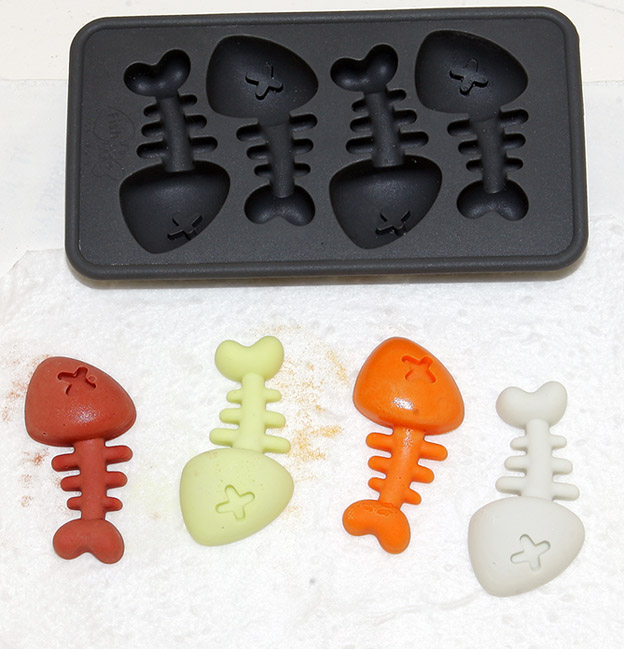 Here they are fired: 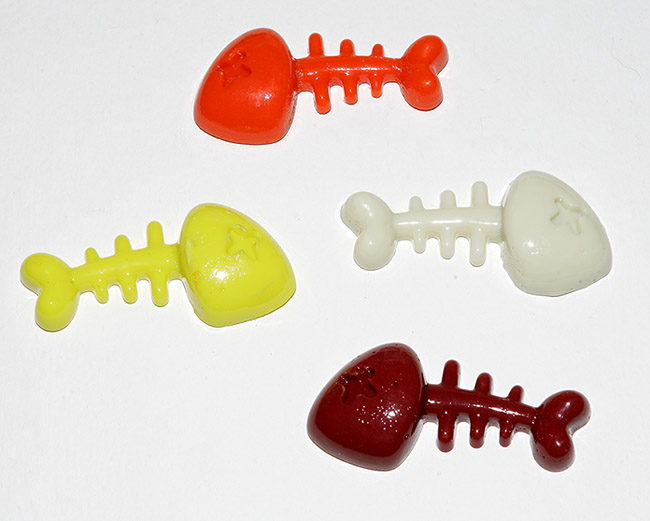 Some pigs from soap molds: 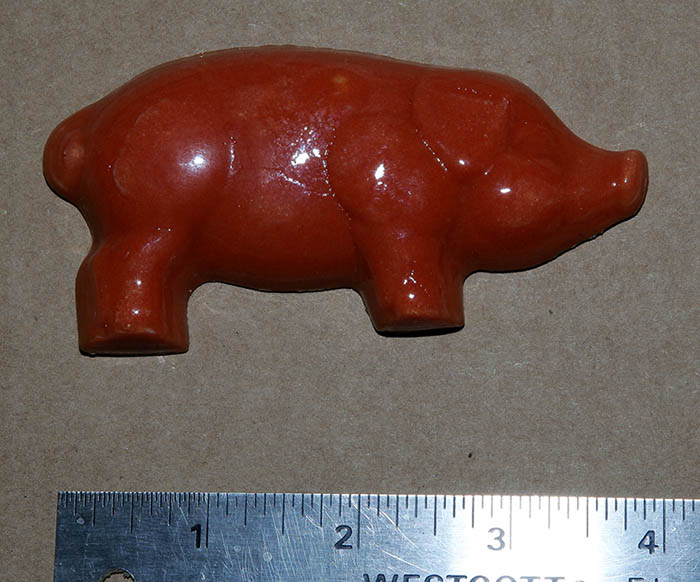 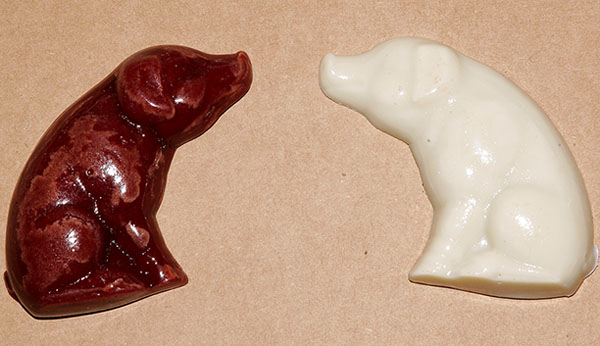 Note the discoloration on the red pig. This was what I was talking about above that I've only seen on the red frit. A lollypop candy mold I just got and tried out. I used a Bullseye rod in place of the lollypop stick that would normally be used. I need to work with putting in the secondary color better next time. 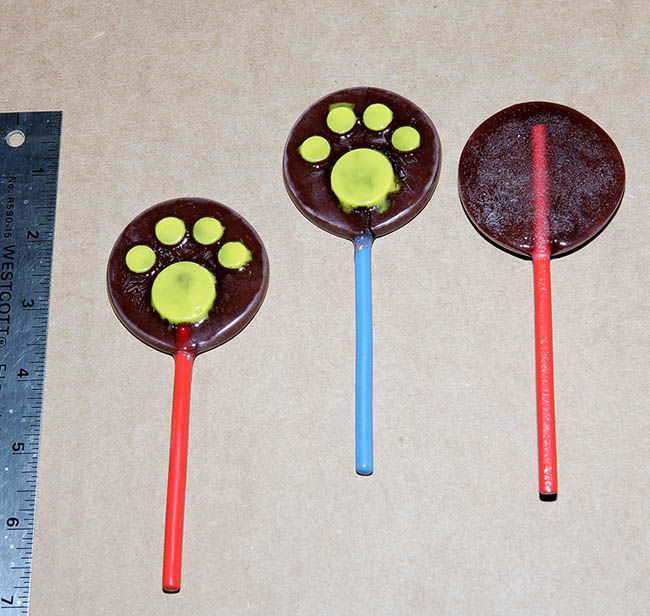 And a Indian princess head: 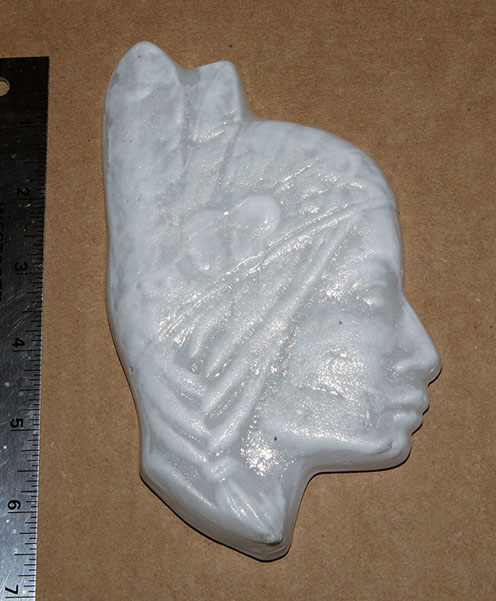 I hope this tutorial encourages others to give Freeze and Fuse a try. It's easy and fun. Mike 
|
|
#2
01-10-2011, 09:30 PM
|
|||
|
|||
|
i like these one and special frog pic
thanks
|
 |
| Tags |
| freeze and fuse, fusing, glass art |
| Thread Tools | |
| Display Modes | |
|
|


 Linear Mode

